P-Body Trunk Leak Repair
[ Body Caulk | Taillight Gaskets | Rear Window Seal ]
Symptoms
A "musty" odor coming from the trunk or hatch is usually the first sign. This is a result of the pressed paper liner between the carpeting and trunk floor starting to rot. If left alone, water will pool in the spare tire bay and the bottom of the bay will begin to rust. Eventually the bay will rot out and can get to the point that the spare tire and jack will fall through the bottom of the car.
Causes
- The body caulk cracks at the joints between the three body panels that meet at the upper-outside corners of the taillights and water seeps in as it runs down the gutter along the trunk/hatch weather stripping.
- The taillight gaskets tend to get compressed and allow water to seep into the cavity between the taillight and the rear wall of the trunk. Water then pools here and eventually flows over the edge and into the trunk.
- The seal between the rear window and the hatch (for hatchbacks and notchbacks) fails due to improper installation of the window or severe rusting of the area around the seal.
Description
The cracked body caulk is the most common cause of trunk leaks. The caulk simply dries up and cracks, allowing water that runs down the gutters along the hatch lid to seep into the trunk. The next most-common cause would be the gaskets. DO NOT just caulk the gaskets to the car. You will never get them off again without destroying the gaskets completely. Since it is easier to repair the body caulk if you remove the taillights, you may as well implement both fixes at the same time.
Repair The Body Caulk
If you have determined that cracks in the body caulk are the cause of your troubles, use this method to repair it:
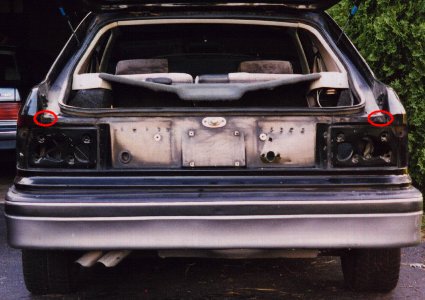
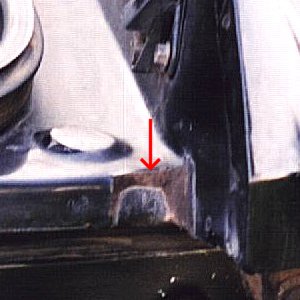
- Inspect the upper-outside area of the rear body panel around where the taillight gasket makes contact. At the edge of the gutter that runs along the outside of the weather stripping for the trunk lid, there is a seam that has been filled with body caulk. Three separate body panels meet here and the caulk is used to seal them together. Look for cracks, especially along the top edge. Here is a shot of my 1987 Shelby CSX disassembled. The circles show the locations of the body caulk in question and the arrow points to the location of the crack:
- Remove interior trunk panels that are in the way of the tail light studs (all three for a P-body).
- Remove all bulbs from the taillights and nuts from the studs to remove the taillight.
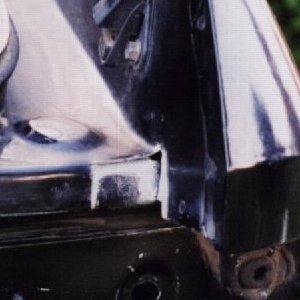
- Take a putty knife or a large, flat-head screw driver and scrap all the caulk out of the joint which also leads up underneath the rear corner body panel. Scrape out as much as you can and reach from the inside of the trunk to remove any chunks of caulk out of the joints. Here's what it should look like when cleaned out:
- To replace the caulk, I would recommend using a pure silicone or polyurethane caulk. Pure silicone adheres to painted surfaces better then RTV or latex/acrylic caulk. Latex/Latex/acrylic caulk tends to get brittle and crack over time. Never use "Silicone II" sink/bathtub caulk, as it is not intended for outdoor use. You can get pure silicone in colors now. I have seen black or white, but clear always works too. Polyurethane (or roof caulk) is the same stuff used on windshields and has good adhesion. When cured, it is still soft and can rub off onto clothing, etc.
- Cut the tube of your replacement caulk with a small hole so you can squeeze it up into all the cracks. Don't be afraid to be liberal with the application of the caulk and make sure the seams are completely filled, however be careful that it does not interfere with the taillight gasket or you may get another leak. Apply it to the seam by the gutter so that the surface is smooth leading over the edge.
- Allow the caulk to cure (read the instructions on the tube) for at least a couple of hours before re-assembly.
Fix Leaking Taillight Gaskets
If you have determined that the taillight gaskets have been leaking water into your trunk, then use this repair method:
- Remove interior trunk panels that are in the way of the tail light studs (all three for a P-body).
- Remove all bulbs from the taillights and nuts from the studs to remove the taillight.
- Clean all dirt and dust from the gasket on the tail light and the area on the rear panel where it seals. Inspect the gasket and look for rips or tears.
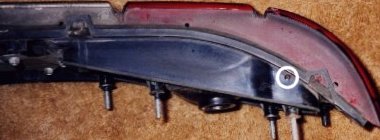
- To keep the cavity from filling up, the simplest thing to do is to drill one or two small holes (1/8" - 3/16" dia) at the bottom of the black plastic between the tail light bowl and the gasket. This way, the water can drain out if it seeps in. Drill the hole towards the outside at the lowest point. The white circle shows the location of the hole to drill. The other holes should already be there:
- It would also be a good idea to help the gasket seal by installing some weather stripping. It is simple and cheap and should be available at any hardware store. Look for closed cell foam weather stripping about 3/8" or so wide. The narrower the tape, the easier it is to install.
- Note the area on the rear body panel that the gasket on the taillight makes contact. Inspect the area for rough surfaces that may inhibit the seal (such as body caulk) and scrap, sand, or file them down. Then clean the entire area thoroughly to remove all debris and wipe it with rubbing alcohol to ensure any oils have been removed.
- Peel some of the paper backing off of the weather stripping and apply it to the rear body panel in the area where the gasket makes contact. Start at the bottom-center of the area and try to go all the way around with one piece as you pull off the backing until you meet at the bottom snugly. If you bought narrow enough stripping it should be flexible enough to go around the corners if you make the curves gentle.
- Now reinstall the taillights and trunk interior.
Sealing The Rear Window
This is a difficult problem to repair completely since there is some hefty body work involved. There is also a quick fix that will work for a while. Either way, you'll need to look at the Window And Windshield Leak Repair page for complete instructions.
Updated 11/12/2003.
Copyright © 1996-2003 Russ W. Knize.